


You can start a free email newsletter on your WordPress site today. WordPress collects email signups, while an email marketing service stores your subscriber list and sends your newsletters.
Whether you run a blog, small business website, or online store, a newsletter helps you reach readers directly without relying on social media or search rankings.
In this guide, we’ll walk you through five simple steps to create your newsletter and show you the tools you need.
Quick Answer: Create a Newsletter in 5 Steps
An email newsletter is a regular email you send to people who sign up to receive updates from you. Here’s how to create one in WordPress: 1. Choose an email marketing service. 2. Create your list and welcome email. 3. Add a signup form to your site. 4. Send your first newsletter. 5. Help your emails reach the inbox.
Here’s what we’ll cover:
- Step 1. Choose an Email Marketing Service
- Step 2. Create Your List and Welcome Email
- Step 3. Add a Signup Form to Your WordPress Site
- Step 4. Send Your First Newsletter
- Step 5. Make Sure Your Emails Reach the Inbox
- Tips to Get More Subscribers
- How to Make Money From Your Newsletter
- FAQs About Creating an Email Newsletter in WordPress
Step 1. Choose an Email Marketing Service
An email marketing service stores your subscriber list and sends your newsletters using servers designed for bulk email. You need one because emails sent in bulk from your web host or regular inbox may be blocked or marked as spam.
For most beginners, we recommend Brevo, which has a free plan that lets you send up to 300 emails per day. Paid plans start at about $8 per month when billed yearly. We’ll use Brevo for the rest of this tutorial.
The free plan includes contact lists, signup forms, a drag-and-drop email editor, and automated emails. These tools are enough to follow this guide.
However, the free plan has some limitations to keep in mind. You can send 300 emails a day, every email carries a small ‘Sent with Brevo’ footer, and automations such as your welcome email work for up to 2,000 contacts. For example, if you have 1,000 subscribers, sending a newsletter to everyone would take four days.
If you run a small business, then Constant Contact may be a better fit. It doesn’t offer a free plan. Paid plans start at $12 per month, or about $10.20 per month when billed yearly.
You can also try it with a free trial that doesn’t require a credit card. All plans include live phone and chat support and tools for managing events and surveys.
Looking for another free option? MailerLite’s free plan supports up to 250 subscribers and 2,500 emails per month. To compare more options, see our picks of the best email marketing services.
Step 2. Create Your List and Welcome Email
Before people start signing up, create a contact list to store their details and set up the welcome email they’ll receive.
Create a Contact List
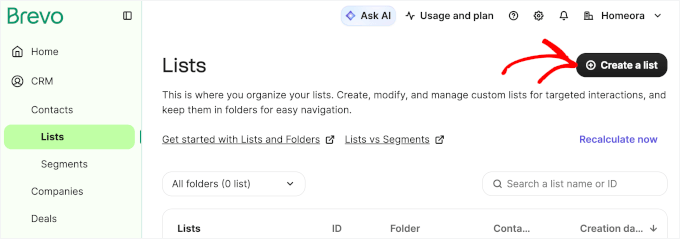
In your Brevo dashboard, go to CRM » Contacts » Lists and click ‘Create a list.’
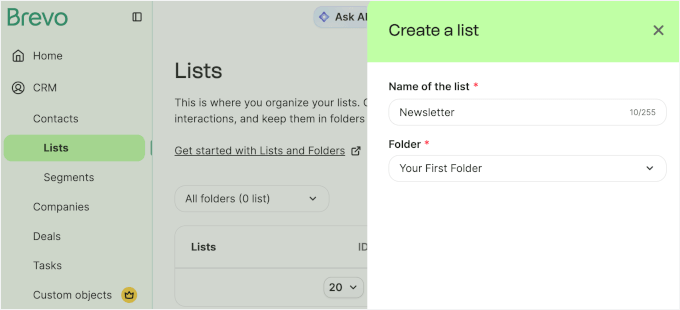
In the slide-in panel, give your new list a name. We recommend choosing something easy to recognize, such as ‘Newsletter.’ Then click ‘Create.’
Write Your Welcome Email
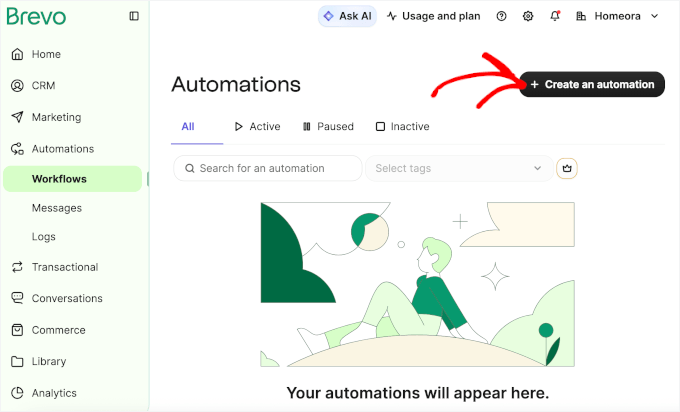
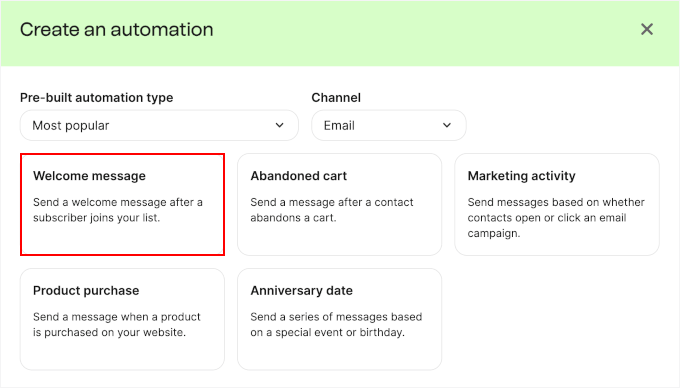
A welcome email is sent automatically when someone subscribes to your newsletter. To set one up, go to Automations » Workflows and click ‘Create an automation.’
In the popup that appears, choose the ‘Welcome message’ template. This will open the Workflow builder.
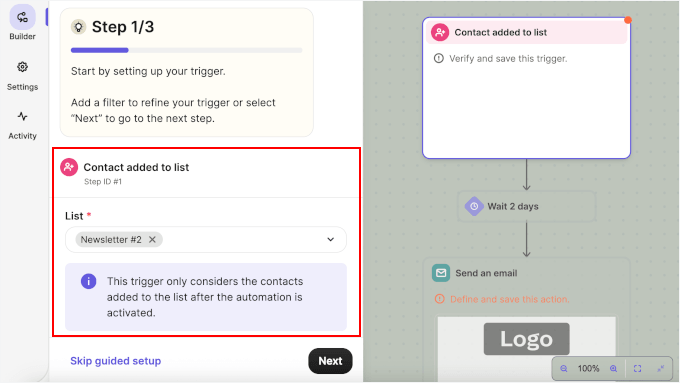
First, set the trigger to run when a contact is added to your newsletter list.
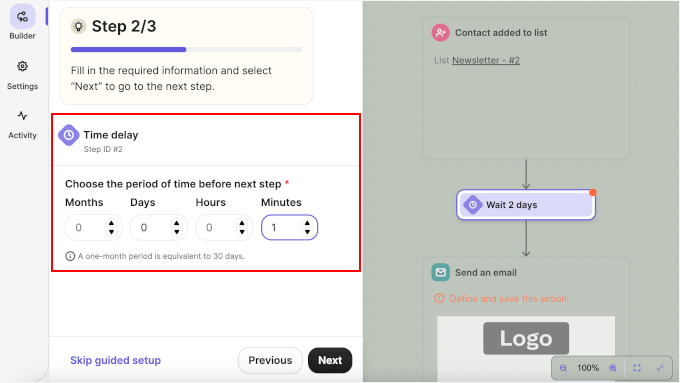
Next, set the time delay. This controls how long Brevo waits before sending the welcome email. If you want subscribers to receive it right away, set it to 1 minute, as Brevo requires you to fill out at least one of the fields.
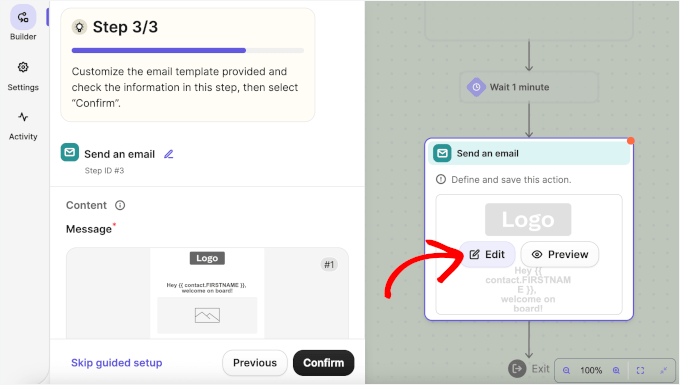
Lastly, hover over the email step and click ‘Edit’ to personalize your welcome email. You can add a subject line, insert a header image, and write your message using the drag-and-drop editor.
Keep these tips in mind when writing your welcome email:
- Use a clear subject line, such as “Welcome to [Your Site],” so subscribers recognize your email.
- Thank them for subscribing and briefly introduce yourself.
- Tell them how often you’ll email and what to expect, such as “one email every Tuesday with our newest tutorials.”
- If you promised a download or discount, include it near the top of the email.
- Link to two or three useful posts so subscribers get something helpful right away.
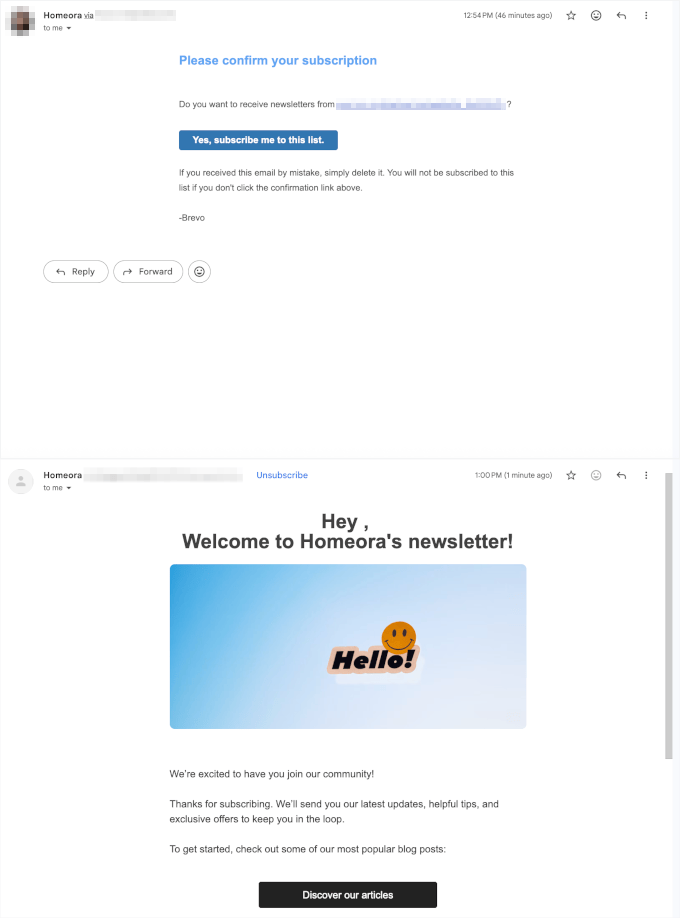
Here’s an example of how your welcome email might look:
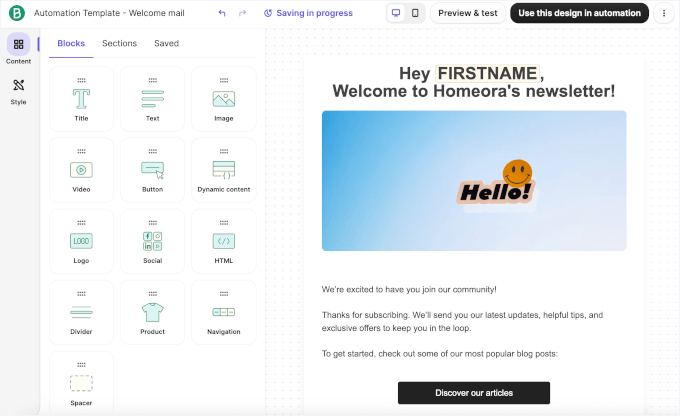
When you’re done, click ‘Activate’ to turn on your automation.
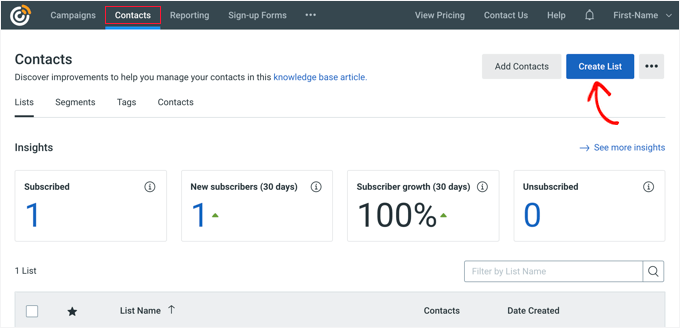
Using Constant Contact instead? You can create lists under Contacts » Lists and set up a welcome email under Campaigns » Create » Email Automation.
Generate a Brevo API Key for WordPress
Before connecting Brevo to your WordPress site, it’s a good idea to generate your API key. This way, you can finish setting up your Brevo account and connect it to WordPress without switching back and forth between tabs.
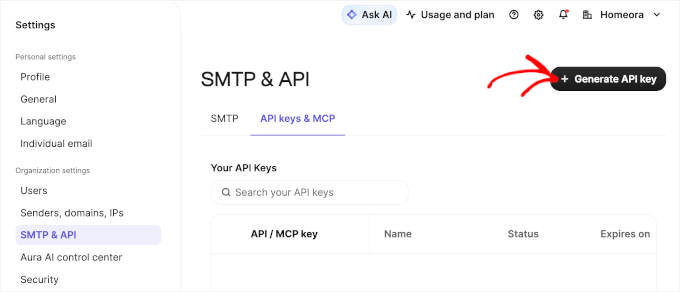
To create a key, click your Brevo profile and go to Settings » SMTP & API » API keys & MCP. Then, click the ‘+ Generate API key’ button.
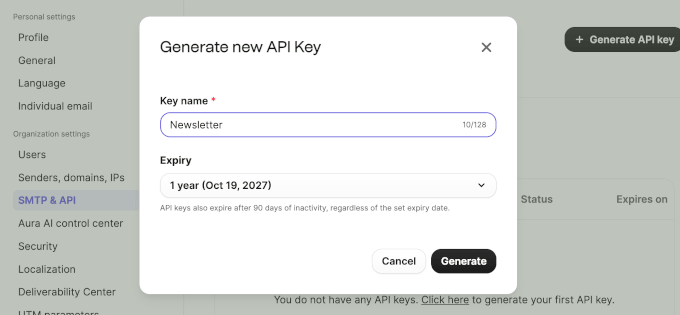
Enter a name for your API key and set an expiry date. Then click ‘Generate’ to continue.
In the next popup, copy your API key and store it somewhere safe, such as a password manager. You’ll need it later to connect Brevo to your WordPress site.
Step 3. Add a Signup Form to Your WordPress Site
Visitors need an easy way to sign up for your newsletter. You can add a free signup form to your posts, pages, or sidebar. You can also use popups and slide-ins to show signup forms as people browse your site.
Method 1: Add a Free Signup Form
Brevo’s free WordPress plugin connects your site to your Brevo account. Once connected, you can create and add signup forms from your WordPress dashboard.
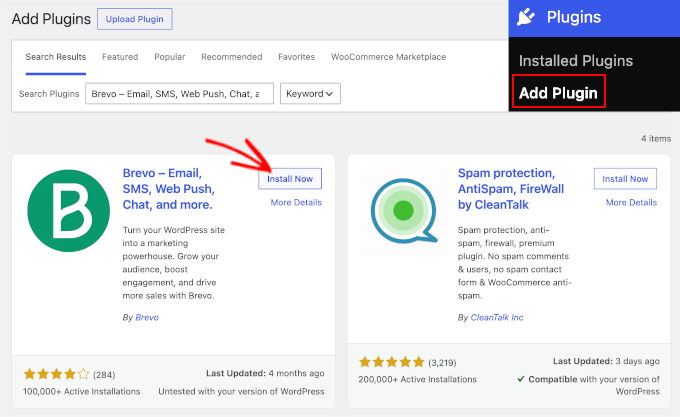
First, install and activate the Brevo plugin. If you need help, follow our guide on how to install a WordPress plugin.
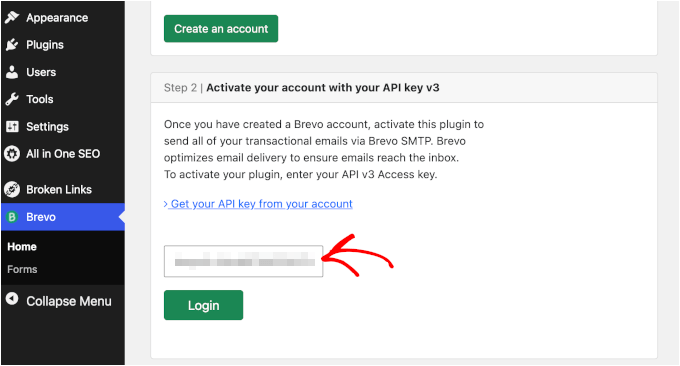
After activating the plugin, go to ‘Brevo’ in your WordPress admin menu and paste your Brevo API key. Then click ‘Login’ to connect your accounts.
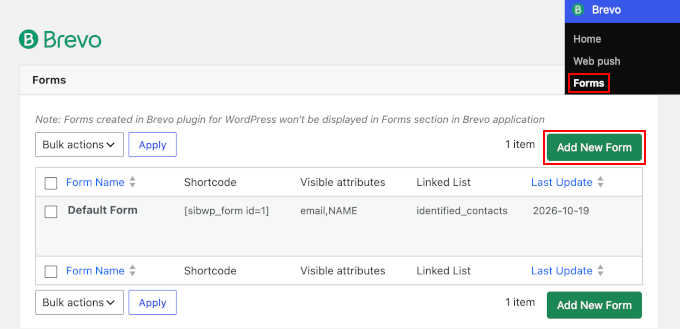
Next, go to Brevo » Forms and click ‘Add New Form.’ This will let you build a signup form that visitors can use to join your newsletter.
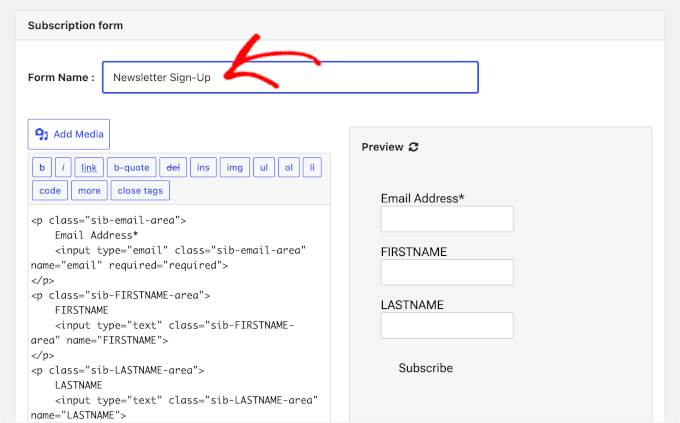
On the next screen, give your form a name. You can also customize its fields to collect the information you need, such as subscribers’ names and email addresses.
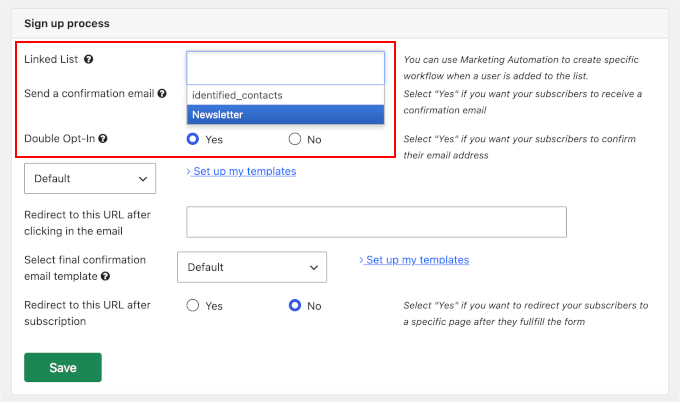
Next, scroll down to the ‘Sign up process’ section. Here, you can choose which newsletter list to add subscribers to and enable double opt-in.
Double opt-in means people must click a confirmation link in their inbox before they’re added to your list. This helps keep fake or mistyped email addresses off your list and protects your sender reputation. It also gives you a record that subscribers confirmed their signups.
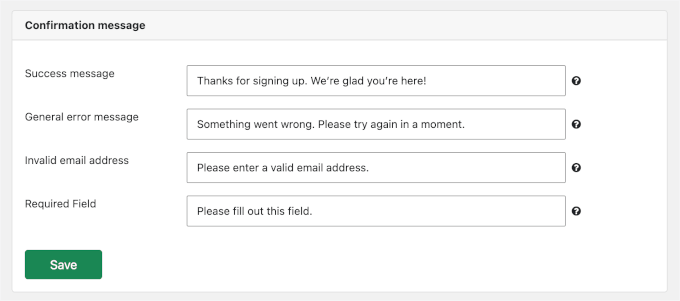
Below that, you’ll find the ‘Confirmation messages’ section. You can edit the default messages to match your website or leave them as they are.
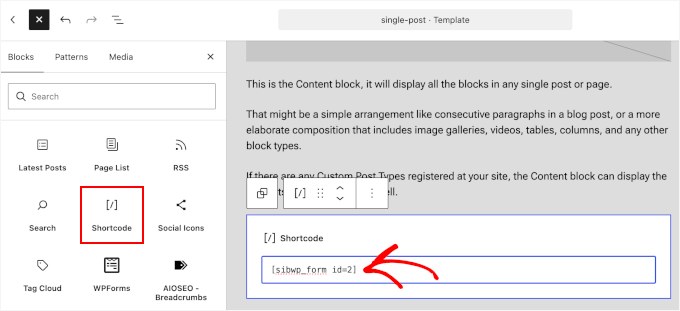
When you’re done, save the form and copy its shortcode.
To add the signup form to your WordPress site, open the post or page where you want it to appear. Add a ‘Shortcode’ block and paste the shortcode into it.
You can also add the form to your sidebar or footer. To do this, use a Shortcode block under Appearance » Widgets, or open Appearance » Editor if your site uses a block theme.
Finally, publish the page and test the form using an email address you can access.
If you enabled double opt-in, you should receive a confirmation email first. After clicking the confirmation link, you should receive your welcome email.
Method 2: Add Popups and Slide-Ins
OptinMonster is a paid tool that displays signup forms to visitors, so they don’t have to look for one on your site. Plans start at $9 per month for the first year, billed yearly at $108, and renew at $210 a year. It also connects to Brevo and Constant Contact.
After signing up, install the free OptinMonster plugin on your WordPress site and connect your account. If you need help, check out our guide on how to install a WordPress plugin.
Once connected, go to OptinMonster » Campaigns in your WordPress dashboard. Choose a campaign type, such as Popup or Slide-in, and select a template.
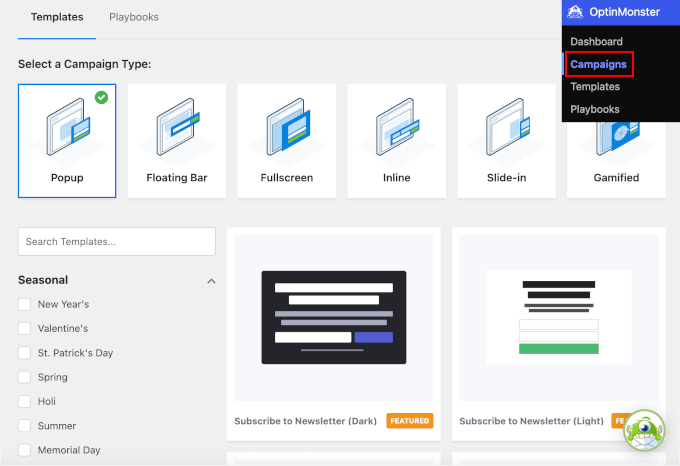
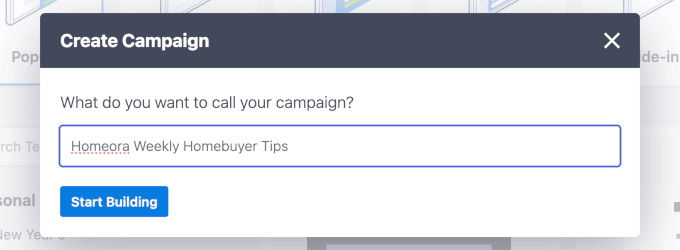
Next, enter a name for your campaign. We recommend using a name that’s easy to recognize. Click ‘Start Building’ to continue.
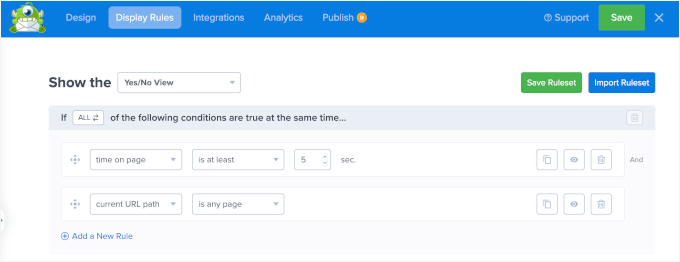
In the builder, you can edit the text and customize the design to match your website.
The ‘Display Rules’ tab lets you choose when your popup appears. For example, you can show it after someone scrolls halfway down a post. On the Pro plan or higher, you can also use exit-intent to display the popup when someone is about to leave your site.
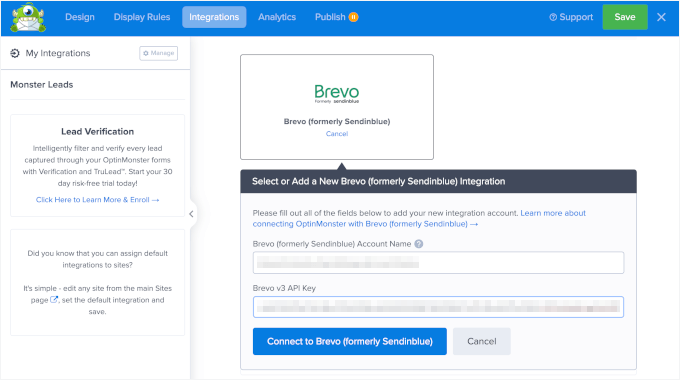
To connect your campaign to Brevo, open the ‘Integrations’ tab and select ‘Brevo.’ Paste your Brevo API key, then choose the newsletter list where new subscribers should be added.
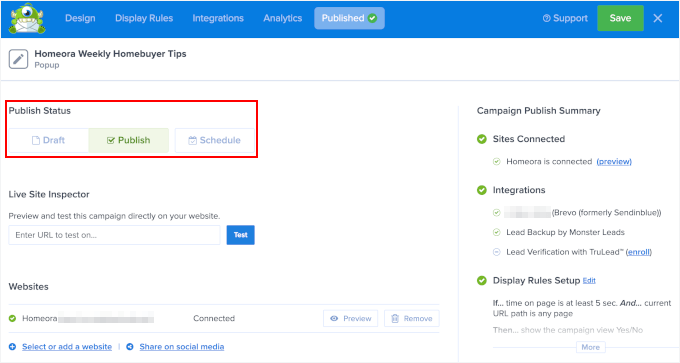
When you’re done, click ‘Save’ and switch to the ‘Publish’ tab. Then, change the status from ‘Draft’ to ‘Publish’ to launch your new campaign.
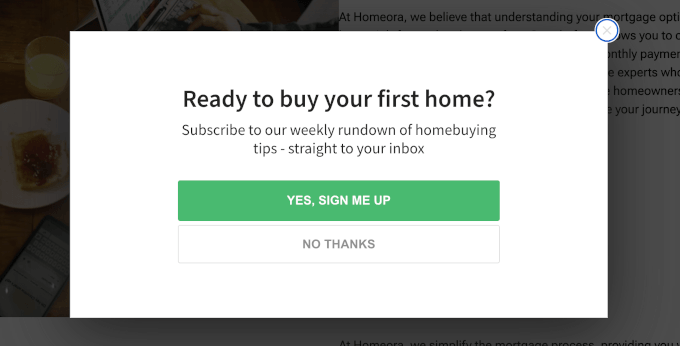
Now, visit your website to see your popup signup form connected to Brevo in action:
Would you rather add a newsletter signup checkbox to a contact or order form? WPForms connects to both Brevo and Constant Contact. The Constant Contact integration is available in the free version, while the Brevo integration requires the Plus plan or higher.
Step 4. Send Your First Newsletter
Your first newsletter doesn’t need a fancy design. A simple layout can work well. Try including:
- One main story or update at the top, with a short summary.
- One clear button that tells readers what to do next, such as ‘Read the full post.’
- A clear subject line that tells readers what the email is about.
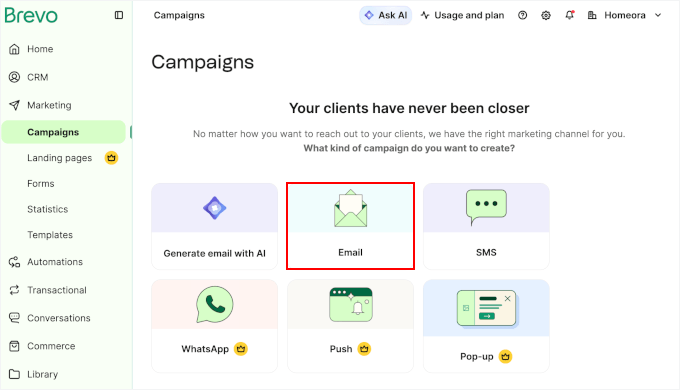
Go to Marketing » Campaigns and select ‘Email’ to start a new email campaign.
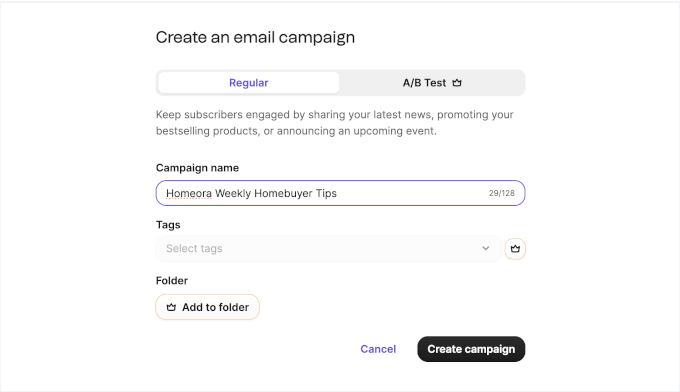
On the next screen, enter a name for your campaign. If you’re using a paid plan, you can also assign tags. Click ‘Create campaign’ to continue.
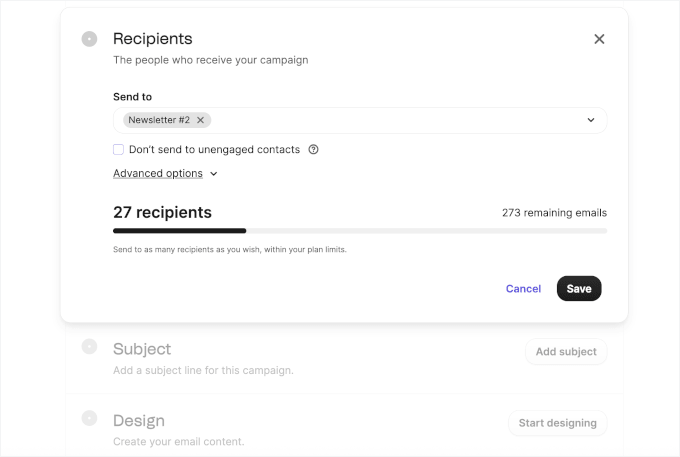
After that, follow the setup steps to choose your newsletter list as the recipient group, enter your subject line, and customize your email.
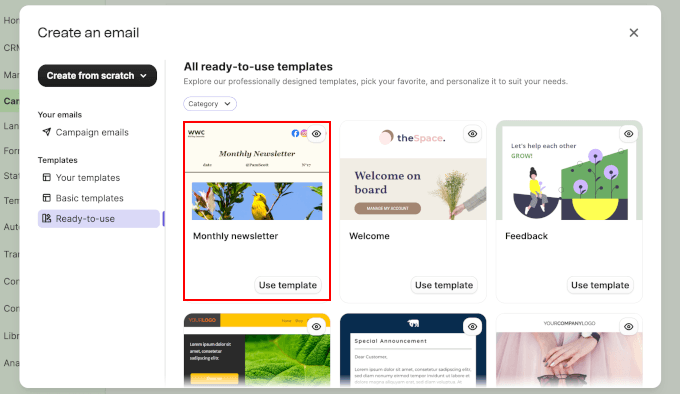
When you reach the design step, you can use a template for your newsletter. Brevo offers 40+ templates on every plan, including the free plan, so you have plenty of options to get started.
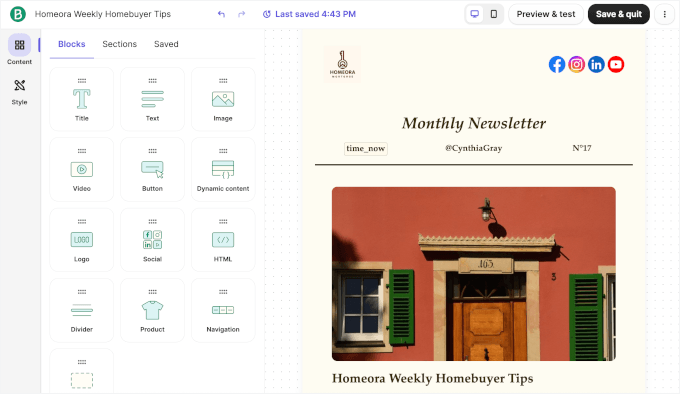
You can then replace the sample content with your own. Add a title, featured image, short summary, links, and any other details you want to share.
Expert Tip: Brevo and Constant Contact offer AI writing tools that can suggest subject lines and draft email copy. You can also paste links to your last three posts into ChatGPT or Claude and ask the tool to write a short newsletter summarizing them. Treat the result as a first draft. Check the facts and links, and edit anything that doesn’t sound like you before finalizing it.
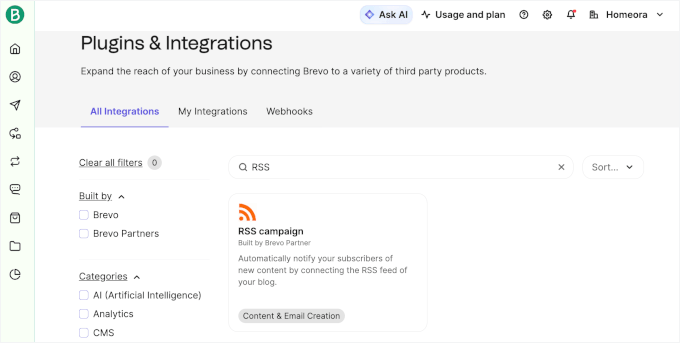
Want to tell subscribers about new posts automatically? Brevo’s Plugins & Integrations page lists an ‘RSS campaign’ integration, built by a Brevo partner, that notifies your subscribers of new content by connecting your blog’s RSS feed. To find it, open Plugins & Integrations in your Brevo account and search for ‘RSS.’
Before sending your newsletter, email a test version to yourself. Check how it looks on your phone and computer, and click every link to make sure it works.
Once everything looks good, schedule the email or send it right away. Sending your newsletter on the same day each week can also help subscribers know when to expect it.
Step 5. Make Sure Your Emails Reach the Inbox
There are two types of email to think about: your newsletter and the automatic emails your WordPress site sends.
Authenticate Your Newsletter Domain
SPF, DKIM, and DMARC are DNS records that help email providers check whether messages really come from your domain.
- SPF lists the servers allowed to send email for your domain.
- DKIM adds a digital signature that helps verify your messages.
- DMARC tells email providers how to handle messages that fail authentication checks.
Since February 2024, Gmail has required all senders to set up SPF or DKIM. If you send 5,000 or more messages per day to Gmail addresses, you must set up both SPF and DKIM, add a DMARC record, offer one-click unsubscribe for marketing emails, and keep your reported spam rate below 0.3%. You can read more in Google’s email sender guidelines.
Even if your list is small, we recommend setting up all three records. You’ll also need a sender address that uses your own domain rather than a personal Gmail or Yahoo address.
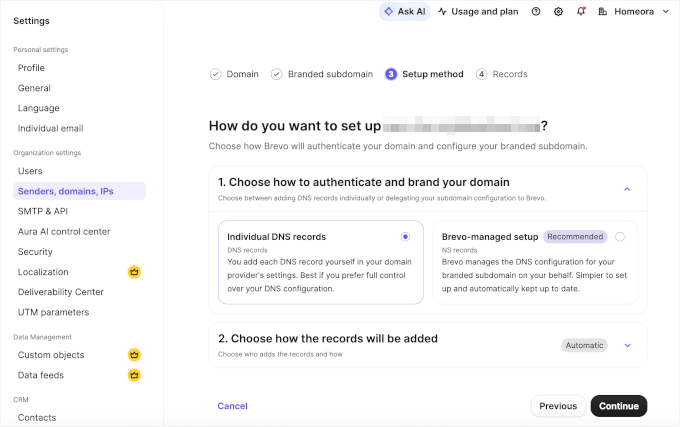
In Brevo, go to Settings » Senders, domains, IPs and add your domain.
Follow the instructions to authenticate it. Brevo will show you which DNS records to add through your domain registrar or web host. Depending on your setup, you may also be able to add these records automatically.
These habits can also help your newsletter avoid spam folders:
- Keep double opt-in enabled, and only add people who have agreed to receive your emails.
- Write subject lines that accurately describe what’s inside the email.
- Include your physical mailing address in the email footer. Anti-spam laws, such as the US CAN-SPAM Act, require this for commercial emails. Brevo and Constant Contact can add your address using your account details.
Fix Your Website’s Own Emails
Your WordPress site also sends emails, such as form notifications, password resets, and signup confirmations from some plugins. These are called transactional emails. They’re usually sent to one person after they take an action on your site.
By default, WordPress sends these emails through your web host. If your host’s mail servers aren’t set up correctly, your messages may land in spam or fail to arrive.
SendLayer is a paid email delivery service that can help fix this problem. Plans start at $5 per month when billed yearly, and you can try the service with your first 200 emails for free. It sends your website’s emails through its mail servers and helps authenticate them with your domain.
In short, SendLayer handles emails sent by your website, not your newsletter campaigns. You’ll still use Brevo or Constant Contact to send your newsletters.
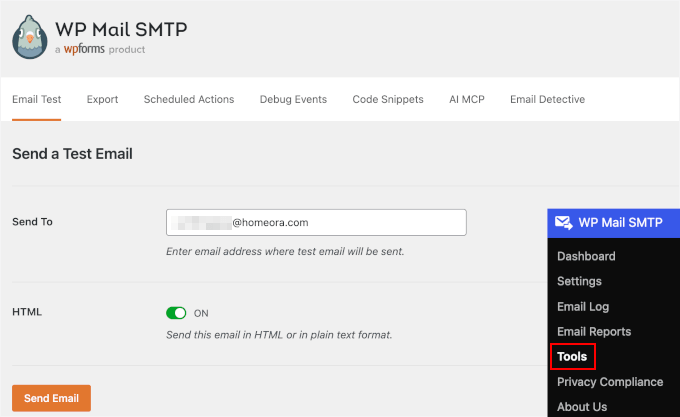
To set it up, connect SendLayer to WordPress using the free WP Mail SMTP plugin. Add the DNS records provided by SendLayer, then send a test email from WP Mail SMTP » Tools. For step-by-step instructions, see our guide on how to fix WordPress not sending email.
Tips to Get More Subscribers
Once your signup form is live, try these tips to grow your email list:
- Use more than one form. Add forms to your sidebar, the end of your posts, and a popup so visitors see an offer at different points. See our guide to lead generation plugins for WordPress.
- Offer a free resource. A lead magnet is something free, such as a checklist, ebook, or discount code, that visitors receive when they subscribe.
- Add content upgrades. A content upgrade is a bonus related to a specific post, such as a printable checklist for a tutorial. See how to add content upgrades in WordPress.
- Promote it on social media. Put a signup link in your profile bios and share your lead magnets in posts. See how to use social media to grow your email list.
- Run a giveaway. RafflePress has a free version that lets you run contests and offer newsletter signup as one way to enter. Compare your options in our list of the best WordPress giveaway plugins.
- Build a landing page. A landing page focused on one goal, such as joining your list, gives you a single link to share anywhere. SeedProd, which has a free version, includes landing page templates. See the best WordPress landing page plugins.
For more ideas, see our guide on how to build an email list faster.
How to Make Money From Your Newsletter
As your email list grows, you can earn money from your newsletter in several ways:
- Sell your own products. Share special offers with subscribers or give them early access to a new course, ebook, or other product.
- Share affiliate links. Recommend products you’ve used and earn a commission when someone buys through your links. Always disclose affiliate links in your emails. Our affiliate marketing guide explains how it works.
- Sell sponsorships. Companies that serve your audience may pay to feature their products or services in your newsletter. Clearly label sponsored content so readers know it’s a paid promotion.
- Offer paid subscriptions. Charge readers for access to premium newsletters with tips, resources, or other content. See our guide on how to create a paid newsletter in WordPress.
FAQs About Creating an Email Newsletter in WordPress
Can you create a newsletter in WordPress?
Yes. WordPress collects signups through a form, while an email marketing service such as Brevo stores your list and sends your newsletters. Don’t send bulk emails directly from WordPress. Most web hosts limit how many emails your site can send per hour, and messages sent from hosting servers may land in spam.
What is the best free program to create a newsletter?
As of November 2026, Brevo’s free plan lets you send up to 300 emails a day. MailerLite’s free plan covers up to 250 subscribers and 2,500 emails a month.
What is the best free newsletter plugin for WordPress?
It depends on whether you want a plugin to send your newsletters or just collect signups. Compare the options in our guide to the best WordPress newsletter plugins.
Is there a better option than Mailchimp?
Yes, if you want to start for free. As of November 2026, Mailchimp’s free plan allows 250 contacts and 500 email sends per month, with a daily limit of 250 sends. Brevo’s free plan allows up to 300 emails per day.
Can ChatGPT make a newsletter?
Yes, it can draft a newsletter, but it can’t send it. Use it to write a draft based on your recent posts, then paste the text into your email service. Check the facts and links before sending it.
Does WordPress have email hosting?
No. WordPress runs your website, but it doesn’t provide an email inbox. To create an address like [email protected], see our guide on how to create a free business email address.
We hope this guide helped you create an email newsletter in WordPress. You may also find our guide on how to add web push notifications helpful, since they work well alongside a newsletter.
If you liked this article, then please subscribe to our YouTube Channel for WordPress video tutorials. You can also find us on Twitter and Facebook.


mike
Thank you for the amazing guide! It came in exactly when I needed it and it was extremely clear. Helped a TON.
WPBeginner Support
Glad to hear our guide was helpful!
Admin
kzain
This is a super helpful guide I’m particularly interested in using pop-up forms to capture leads, and OptinMonster seems like a great tool.
However, I currently use WPForms to collect email addresses for Mailchimp, which is where I manage my subscriber list. The article recommends Constant Contact, but I’d prefer to stick with Mailchimp since I’m already familiar with the platform.
Is it possible to integrate OptinMonster with Mailchimp to collect email addresses through pop-up forms and add them directly to my existing Mailchimp list? Thanks for any insights!
WPBeginner Comments
Yes, OptinMonster has a Mailchimp integration.
Jiří Vaněk
With this combination, I have currently set up the latest newsletter, or rather, the registration on my website. I have a campaign with the user exit trigger. The campaign is created in OptinMonster and connected to Mailchimp. When a user is leaving the website, they are prompted with a popup asking if they would like to register for the newsletter. This combination has kickstarted my address collection, which hadn’t been working at all before. So, to answer your question, yes, you can combine OptinMonster with Mailchimp, and it works absolutely brilliantly.
Hajjalah
I have successfully created my newsletters subscription and emailing campaign with knowledge from this article. My newsletter subscription rate was very low before, but with tips from this article, the rate has increased although it is not that big but i believe no achievement is small.
WPBeginner Support
Glad to hear it is improving, we hope our recommendations help your newsletter continue to grow
Admin
Moinuddin Waheed
Small steps taken at the right time and with right tools and guidance make it big at the end.
No acheivment is small or big it is only how we take it and celebrate it. The initial acheivments which carve out the path to the big ones or pathbreaking success in future are the ones that should be celebrated and appreciated most. These are the cornerstones of big success.
I have make a point to celebrate every acheivement no matter how small or big it may seem to others.
Moinuddin Waheed
Starting out my email newsletter journey again which I had left after a while.
I used mailchimp free version for that purpose and didn’t continue for long.
However, given the potential of email newsletter for growing the business, I am planning to make one for my coaching website.
Thanks for the indepth illustration of all the steps.
WPBeginner Support
You’re welcome
Admin
Mrteesurez
This is indeed an in-depth article that nailed out matters related to newsletter. I have noted some points concerning ways to keep my emails from going to spam box, everyone businesses need to know this.
Thanks for this article
WPBeginner Support
You’re welcome
Admin
Jiří Vaněk
Is it possible to connect Optinmonster with Mailchimp? I currently use WPForms to collect addresses for MailChimp, but I would like to use a pop up window from OptinMonster for this. You recommend Constant Contact, but I’d rather use Mailchimp, where I already have an account. Thank you for answer.
WPBeginner Support
Yes, you can connect OptinMonster to MailChimp
Admin
Jiří Vaněk
Thank you for the advice. Based on it, I created a campaign in OptinMonster (Yes/No) and connected OptinMonster with Mailchimp. It works brilliantly and has helped me increase newsletter registrations by dozens of percent. So, thanks for the push forward. It has helped me get my newsletter off the ground.
Jiří Vaněk
I started collecting emails on my website last week and I’m just getting ready for my first newsletter. I’m practically an absolute novice and even if I’m certainly familiar with some rules, I really appreciate a manual like this. With it, the first newsletter will be much easier.
Peter Iriogbe
Thanks for this great content!
I’d like to ask: Is Mailchimp a good choice for an email newsletter? I’ve heard many of my competitors talking about it.
WPBeginner Support
It would depend on your specific use case, we would recommend taking a look at our list below for our recommended email marketing services:
https://www.wpbeginner.com/showcase/best-email-marketing-services/
Admin
THANKGOD JONATHAN
I love the article it’s detailed and informative. However one thing I descover and I think it may be good if I share it.
Many often I see businesses putting their concern about how to build a good email newsletter but forget to learn the mistake to avoid in their newsletters.
Please as you make efforts to build an outstanding email newsletter, remember here are most of the things you should avoid in your newsletter as much as possible:
1. Excessive links much especially promotional links.
2. sending too long or too short newsletters
3. sending too often at a time. Make the number consistent.
4. Emails that do not add value or benefit
5. No branding
6. etc.
There are actually many mistakes to avoid. You need to be carefull.
Happy newsletter.
WPBeginner Support
It will require some testing depending on the content for some of these suggestions but thank you for sharing
Admin
Moinuddin Waheed
I can testify the fact that I have purchased many products and services because of the promotional offers received through email newsletter. I used to wonder how these people send customized emails to me and infact every email they send is customised and seems like it has been curated only for me. This infact is the potential of email newsletter. it creates a personal bonding with the blog or product.
I will definitely try contant contact in the future.
Sameer Hussain
Well, this was an eye opener to say the least, the fact that your website visitor should become your subscribers, now this is something insightful. Apart from this, you should really focus on copywriting aspects of your newsletter. That surely turns a visitor into subscriber.
Ahmed Omar
it is important to have a big subscriber list, as they will be your returning customers or visitors
thank you for the detailed post
WPBeginner Support
We agree and you’re welcome
Admin
Vivek verma
thank you so much
WPBeginner Support
You’re welcome, glad our article was helpful
Admin
Gloria
Can I do this with my mobile phone, cuz the process I am seeing there is different from the setup you wrote about
Honesty
Yes it is possible you can also put your web browser in desktop site so it look like your are doing it with a PC
Nathaniel
If one creates an email list with one email marketing firm if you want to choose another email marketing provider, will you lose all your subscribers, or how is it done to retain the all list when you migrate? I’m new to this blogging and will in the future be one hopefully.
WPBeginner Support
Most if not all email marketing services offer you the ability to transfer your email list to a different service but each has its own way to do so.
Admin
Adam Smith
This is very helpful and informative!
WPBeginner Support
Glad our guide was helpful
Admin
Roy Stensvold
There is a lot of conciderations I never thought of
Love the way you take this step by step
WPBeginner Support
Glad you liked our article
Admin
Dotty
I am ready to start collecting emails and doing newsletters, it has taken me a month to get to this point.
WPBeginner Support
Glad you’re ready to get started
Admin
Mahi M
Thank you wpbeginner for this wonderful post, Simply explained everything related email newsletter. Very informative for beginners in WordPress like me.Thank you very much, hope more n more posts like this.
WPBeginner Support
You’re welcome, glad you found our content helpful
Admin
Noman
Great article and extremely informative. There’s a typo (and an important one as it’s the anchor text) that I’d like to point out:
“WPForms is the best drag & drop WordPress from plugin in the market.”
It should be ‘form plugin’, not ‘from plugin’ as mistakenly typed in.
Thanks for the article again!
WPBeginner Support
Thanks for pointing out the typo, we will be sure to get that fixed
Admin
Jenny Julies
Thank you very much for this in-depth and valuable guide. It is exactly what I have been looking for.
Kind regards and God bless
WPBeginner Support
You’re welcome, glad our guide was helpful
Admin
Ranojit Kumar
This article helps me a lot because I have a small online store and a local online newspaper. Thanks, WPBeginner.
WPBeginner Support
You’re welcome
Admin
Ans
This is a very good post and it help me about setting up email newsletter.
WPBeginner Support
You’re welcome, glad our article could help
Admin
Cathy Fraser
I am so thankful that I decided to read this article! I have been wanting to start an email list and didn’t have a clue how to go about it! THANK YOU!
WPBeginner Support
Glad our article could be helpful
Admin
Jochen Gererstorfer
Thank you for your article. I really have to work on my newsletter list.
As always a very extensive article with much value.
Thank you
WPBeginner Support
You’re welcome, glad our guide could be helpful
Admin
Guy Lawfull
Thanks for this excellent article. It’s something that I need to do on our new website.
WPBeginner Support
You’re welcome, glad our article was helpful
Admin
Ahmed
Hi there,
There is not two month trial and credit card is required ! ! !
WPBeginner Support
If you use the link in our article you should be directed to the landing page for WPBeginner users that shows the free trial.
Admin
Oniri Pius
This is superb! it will incredibly help me in my digital marketing race, thank you.
WPBeginner Support
You’re welcome, glad our guide can be helpful
Admin
Clement
Email marketing is one of my favourite articles. It’s a must-read for any serious online marketer. Great to read about it here!
WPBeginner Support
Glad you like our article
Admin
Arrigo
Thank you for the amazing guide! It came in exactly when I needed it and it was extremely clear. Helped a TON. Cheers, Arrigo.
WPBeginner Support
You’re welcome, glad our article was helpful
Admin